Publishing
...and un-publishing.
Cascade is not the web server. You can create, edit, save and preview assets in Cascade but they are not visible on the web until they are published.
Publishing sends items to the web server and makes them available to everyone on the internet.
Unpublishing removes items from the web server so they are no longer available online.
IMPORTANT: Often there is a need to delete, move or rename an item from your webpage. Simply deleting, renaming or moving will not remove the old information on any of the browsers. The item must be unpublished in Cascade so that it may be removed from the web server.
Direct Publishing
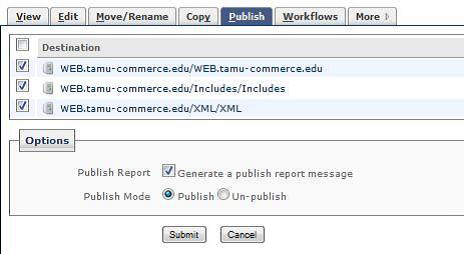
Most Cascade users can publish any of their assets by selecting the Publish tab then clicking Submit. Your publish job then goes into the queue behind any other publish jobs. Once your job is in the queue, you are free to continue working. Any changes made after submitting to the publish queue will not be published unless you submit for publishing again.
The publishing action is available for:
- Pages
- Files
- Folders
- Sites
- Targets
- Destinations
- Publish Sets
To publish one of these asset types:
- Navigate to the asset
- Select the Publish tab

- For Pages only: Select the checkboxes for the Page’s configurations that you’d like to publish.
- Select the checkboxes corresponding to the Destinations you’d like to publish to.

- Select Submit to publish your content to the selected destinations.
- CMS will respond with the following message if your page publish successfully

Un-Publishing an item
- Select the asset (Note: action applied to a folder, apply to everything within that folder)
- click the Publish tab
- Change the radio button from Publish to Un-publish
- Click Submit
- This page no longer exists on the internet, but remains in Cascade for editing and future publishing.
Note: your assets could be re-published at any time by a fellow site editor or a scheduled job. Follow the steps below if you need to prevent your asset from being re-published.
Preventing something from Publishing (including by a scheduled job)
This can be useful if you do not want a page you're building in Cascade to be on your website now, but you will want it there in the future.
- Select the asset (Note: actions applied to a folder, apply to everything within that folder)
- Click the Edit tab (for individual pages, you will also need to click on the System sub-tab)
- Un-check the Include when publishing checkbox.
- When you're ready for the page to be published, re-check the Include when publishing checkbox. Note: DO NOT uncheck the Include when indexing checkbox unless the asset is an individual blog, directory, announcement or event page.
If an asset is published an you want to un-publish it AND prevent it from publishing... you'll need to un-publish it first.
Some Suggestions/Hints
- For efficiency, if you are just editing one page/folder, only publish that page/folder.
- If you have added a new page, moved a page, delete a page or made changes that affect menus, publish your entire site. Go to your root folder, click Publish and Submit.
- If you are making several changes that you think will require a publish of your entire site, make all of your changes and do the full publish one (Note: there are others publishing as well and Cascade processes each item one at a time as they appear in the publish queue).
- If you'd like to see the progress of a job you have submitted to publish, you can change your settings to immediately show you the publish queue after submitting a publish request. Click the 'swirly' icon in the blue toolbar at the top, go to Publisher >> Active Jobs. This page refreshes every few seconds to show your progress.


